- Where do I find my video feeds?
- What are my options when viewing video feeds?
- What is Motion Search?
- How do I export recorded video?
- What does the Screenshot option do?
- What happens in Fullscreen mode?
- What does the Stream Indicator tell me?
- How do I use the Calendar?
- What is Time Scrubbing?
- What does the Timescale do?
- What does Digital Zoom do?
Learn how to find and use your Advantage Surveillance (formerly SmartSurveillance) video feeds. This user guide will walk you through where you can view your recorded videos or live video feeds and optimize your video settings for your specific business needs
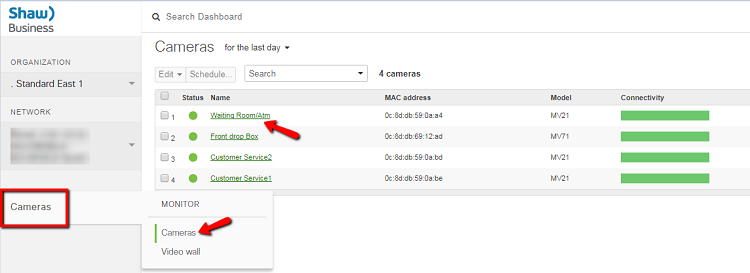
Where do I find my video feeds?
Get started by logging into the online portal at dashboard.meraki.com with your credentials.
- Navigate to Cameras > Monitor > Cameras.
- Select one of the cameras to monitor the live feed from or view previously recorded video.

Pro Tip: By selecting the wrench icon on the far right, you can customize this view to show other information of interest.
What are my options when viewing video feeds?
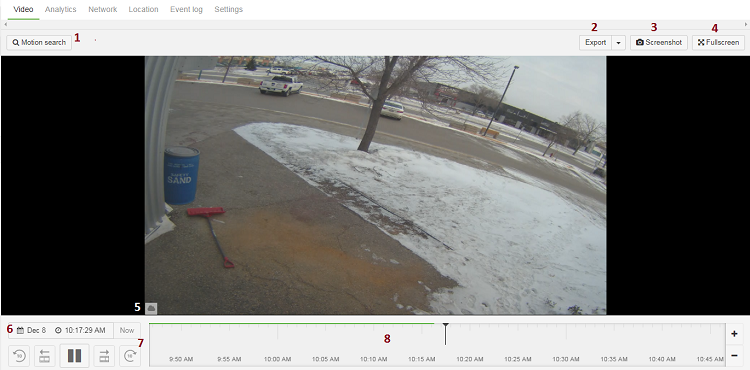
Listed below are all of the options that you have when viewing your surveillance video feeds.
Each feature is described in detail below.
| Options | Description |
|---|---|
| 1 – Motion Search | A key Meraki feature, pressing ‘Motion Search’ will toggle a grid overlay and enable the motion search feature. |
| 2 – Export | Enables the exporting of video. |
| 3 – Screenshot | Takes a static screenshot of the video frame being viewed. |
| 4 – Full Screen | Toggles the display into full-screen mode. |
| 5 – Stream Indicator | Indicates cloud streaming (cloud icon) or direct streaming from the LAN (arrow icon). |
| 6 – Date/Time Navigation | Allows quick access to a specific day and time. |
| 7 – Time Scrubbing | Quick access buttons to scrub frame-by-frame or 10 seconds forward or reverse. |
| 8 – Timescale | Allows navigation to specific times on the Dashboard. Zoom in or out as required on the timescale by using the '+' and '-' buttons. |

What is Motion Search?
The Motion Search feature is an analytical tool that provides motion-based searching for a specified area of interest within the displayed timescale selected. To use this feature: A. Select motion search at the top of the screen. A grid will appear on top of the video feed where a region of interest can be selected.
B. Select a region or object to determine when that region last saw activity.
C. A timestamp, ordered from the most recent, will be displayed. Clicking the 'Zoom out' button will allow for older video footage to be included in the analysis.
D. The duration of the motion, percentage of the entire frame that had motion detected, and percentage of the region that had motion detected will be displayed. E. A screenshot of the current image can be downloaded by clicking on the screenshot button.
F. Clicking the export button allows the user to export a video clip of an event of interest. If large time frames are selected, it may take a long time for retrieval of the video. Uplink bandwidth may also determine the time it will take for an upload to be made available.

Once a search box is selected, the dashboard will return however many events occurred in that search area over the time period displayed on the timescale.
The best practice is to select the smallest area possible so that the search results returned are meaningful. Selecting a large search box will return more results, which will mean that you will have to scroll through many more events.
There are two sliders above the table. These can be helpful to filter out events when dozens of events are returned.
- Motion sensitivity: This slider is based on the ‘Region of Interest’ percentage. Reducing this slider (the further left the slider is moved) will cause events with lower percentage (%) scores to be removed.
Minimum event length: This slider can be increased (moved to the right) to view only longer events.
Once filtered, simply select the event you want to view and the video will start playing.
Note that the grid overlay stays active when playing an event, which can obscure the video.
Pro Tip: Click on ‘Motion Search’ to disable the grid to view the event more clearly. Reselecting ‘Motion Search’ later will bring up the previous search results, assuming the timescale has not changed.
While the video is playing, use the Time Scrubbing controls to pause and advance the video in 10-second or frame-by-frame increments. Clicking within the 'Timescale' will provide coarser time scrubbing.
How do I export recorded video?
Exporting can only be done from the individual camera view, not from the video wall.
 Follow these steps to export your recorded surveillance video:
- Pressing the export button will allow you to export a video clip of an event of interest.
- Across the top of the frame you can specify a specific start and stop time.
- Alternatively, blue sliders are provided on the Timescale, and these sliders can also be moved to select the time period in the same way.
- Once you're happy with the timeframe for export, select the 'Export' button on the top-right portion of the frame.
- Once pressed you will see a new status box at the bottom of the video frame.
- When the video is ready for download, the table will indicate it.
- Click on Download.
- An MP4 video will begin to download via your browser to wherever your browser download folder is located.
- When you play the video, there will be a black frame at the start of the video indicating the date and duration of the video clip.
- The video will also be overlaid with the camera name and timestamp at the top corners.
The completed download will go to the local "Downloads" folder. At this time there is no way to change the folder that this will be saved to.
If large time frames are selected it may take a long time for for the video to be retrieved. Uplink bandwidth may also determine the time it will take for an upload to be made available.
What does the Screenshot option do?

You can take a screenshot of your Advantage Surveillance video feeds. Pressing the Screenshot button will immediately download a screenshot of the current video frame to your browser download folder as a .PNG file. Note: The screenshot will not contain the timestamp in the actual picture, but the filename will.
What happens in Fullscreen mode?
 There are a few items to note with using Fullscreen mode.
- When selecting Fullscreen, all dashboard controls will fade away and only the camera video will be displayed.
- You can scrub the video while in Fullscreen mode by mousing over the video. When moused over, the timescale, scrub controls, and date/time selection will be visible. The controls will naturally fade away after a few seconds of inactivity.
- Fullscreen mode can be exited by pressing 'Esc' or the Exit fullscreen button.
What does the Stream Indicator tell me?
- There is always an icon present in the bottom left-hand corner of the video frame. This icon indicates whether you are streaming the video via the Meraki cloud or locally, directly from the camera over the LAN.
- A cloud icon indicates that the video is being streamed via the Meraki cloud. When a cloud icon is present, this means the video is consuming upstream bandwidth.
- An upward arrow indicates the video is being streamed directly from the camera to the user's device. This is preferred when viewing at your business location so it does not consume upstream bandwidth.
![]()
Faster playback while streaming from the cloud will use more bandwidth depending on the speed of the Internet connection and number of cameras in use.
How do I use the Calendar?
To use the calendar, click on the Date/Time navigation pane to pull up the Calendar menu. Clicking on this allows for quick navigation to a specific date, or you can navigate to a date and time by using the 'Search' field.
Example shown below:
For example, selecting "Yesterday at noon" will show the camera feed for that specified timeframe.

What is Time Scrubbing?
Time Scrubbing allows you to skip forward or backward on a recorded video.
- This is only available when viewing historical video.
- The 10-second skip buttons can be pressed while the video is playing.
- The forward and reverse frame buttons are only available while the video is paused.

What does the Timescale do?
The Timescale is usually where most of the course video navigation is performed.
- A cursor indicates where on the timescale the current video is playing from.
- In the example above, we are looking at video just before 8:55 AM.
- Within the Timescale, you can move the cursor to another timeframe, just by clicking on the Timescale.
The green line indicates if video is available. When using motion-based retention, the cameras will delete video older than three days if there was no motion in the segment.

What does Digital Zoom do?
You can use your scrollbar or mouse to zoom in and out of the video. When using the MV32 fisheye, zooming in will automatically switch the video to a dewarped view, after which you can zoom in up to 12x as in any MV. Note: Digital Zoom is currently unavailable on Firefox desktop browser.
Fisheye View (warped, default view)
The default view for the MV32 is a circular, warped, 360-degree view. This is supported on all platforms. To change to a different view or to go back to fisheye view, click on "Change View" on the bar above above the feed.
DPTZ Experience (dewarped view)
To generate the DPTZ view, the circular fisheye image is mapped to half of a sphere, which you can navigate on a PC or a mobile device. The other half of this sphere is a black canvas.

PC Experience: Click, drag and scroll
With the MV32 fisheye camera, you can see a dewarped image and do DPTZ using the Meraki dashboard. Click "DPTZ" in the "Change View" dropdown. From this view, you can navigate around the field by clicking and dragging to pan and tilt. You can also scroll for digital zoom. Scrolling while in fisheye view actually puts you in DPTZ mode automatically (and you can keep scrolling for additional zoom).

Mobile Experience: Motion-based
While using a mobile browser, DPTZ is replaced with an immersive mobile viewing experience that tracks your motion to pan and tilt around the field of view. To get to this option, click "DPTZ" in the "Change View" dropdown and start moving around.
Note: DPTZ with live video on iOS is currently not available.

