Learn how to set up SSL on your Shaw-hosted website using SSL Manager, an online tool that helps set up SSL security for websites and web applications.
Securing your site with a SSL certificate
An SSL certificate is a data file that authenticates the identity of a website and helps make the information more secure by encrypting the information sent to the server using Secure Sockets Layer technology.![]() Did you know?
Did you know?
Adding a SSL certificate to your website can increase your Google ranking?
Websites using forms, taking payment, or collecting sensitive information require SSL security. It is only available on select Shaw Hosting packages. With the Shaw Web Hosting SSL Manager you can choose between generic SSL certificates or creating a vanity certificate specific for your site.
You can access your Shaw hosting SSL Manager by following these steps:
- Log in to the web portal at shawhosting.ca/.
- Select Web Apps from the drop-down menu under your login name. This is located on the blue bar in the top-right corner of your screen.
- Select SSL Manager under Security on the Web App overview page.
Generic SSL Certificate
Generic SSL is ready and active by default for Shaw Hosting plans, but website is only secure if site is setup to redirect to use generic SSL address.
Note: Not compatible with Online Presence Builder, Wordpress, Joomla, and other content management systems.
What is the difference between Generic and Vanity SSL certificates?
The difference between the generic and vanity SSL certificate, is the URL for your secured files will look something like this: https://secure11.securewebexchange.com/mydomain.com
The URL cannot be customized like Vanity SSL certificates.
How do I use Generic SSL Certicate?
- Follow steps on securing files listed below to verify proper setup in Hosting system.
- Redirect pages to use https://secure11.securewebexchange.com/mydomain.ca.
- Check how site loads currently:
- Address bar shows only domain and the site will show not secure warning. This means:
- The redirect has not been set up yet or the Generic SSL url is not loaded in the browser.
- Try loading secure website version (example: https://secure11.securewebexchange.com/mydomain.ca) to verify it loads and shows secure. If it does not, a redirect has not been set up.
- Address bar shows https://secure11.securewebexchange.com/mdomain.ca:
- if site loads this way and shows secure, the redirect has been set up properly.
- Address bar shows only domain and the site will show not secure warning. This means:
How to create a vanity SSL certificate
With a vanity SSL certificate, the URL is chosen and paid for by a third party SSL issuer or Vanity SSL (extra cost). This is a two-part process. First, you will have to generate a certificate request in the Shaw Hosting Portal, and then purchase the certificate through the third party SSL issuer.
Follow the steps listed below.
Step 1: Select Certificate Type
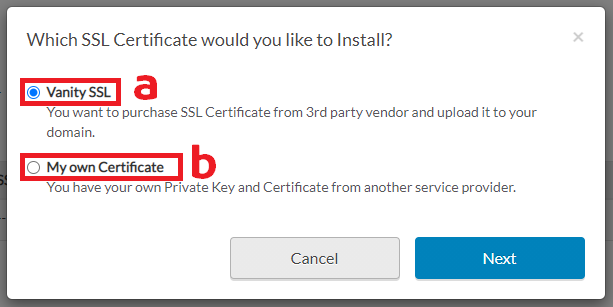
- In SSL Manager, select Install.

- Select SSL Certificate type
a. Vanity SSL
b. My Own Certificate
- Select Next .
Step 2: Generating Certificate Request(CSR) & Uploading
If you chose Vanity SSL follow these steps:
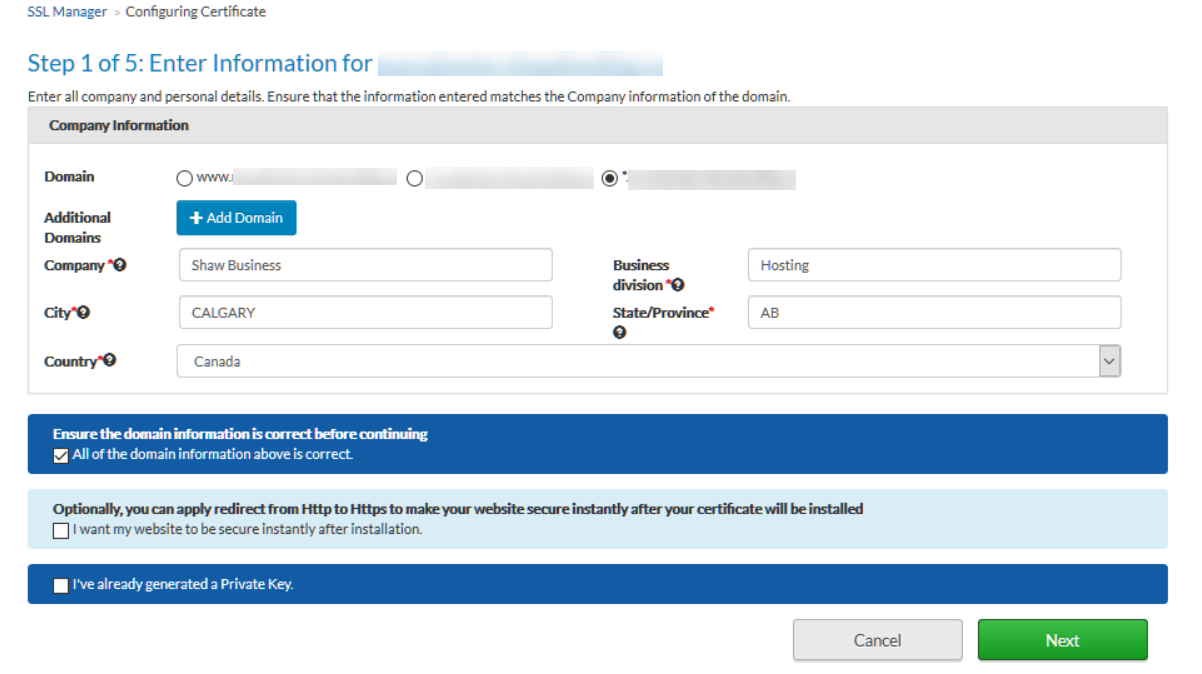
- Review the domain details and check off All the domain information is correct.
- You can check off Optionally, you can apply redirect from HTTP to HTTPS to maker your website secure instantly after your certificate will be installed. (this can also be done after the SSL certificate is installed):
- Important: If you are using WordPress, Joomla or Online Presence Builder, DO NOT check this option. When the SSL certificate becomes active you may lose access to your site. First enable SSL in your content manager and then enable this option.
- Click Next.

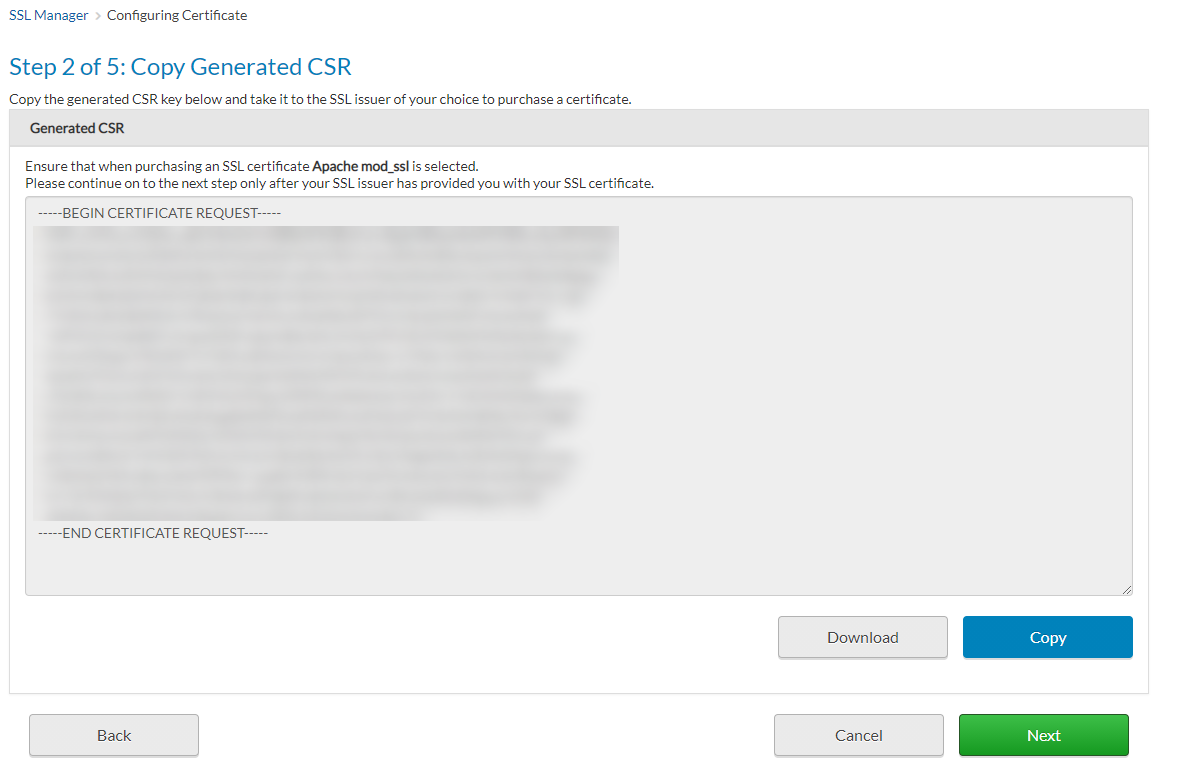
- Copy or download the text from CSR field. You will need to provide the CSR to the 3rd party SSL issuer (example: Verisign) where you will purchase the certificate.

Once you have received the certificate files from the 3rd party provider, log back into SSL manager and select Vanity SSL and then Next.
- Back on the *Configuring Certificate *screen click Next.
- Copy or upload the CSR content you received from your 3rd party provider.
- If you are unsure of which files are to be used, contact the 3rd party provider for assistance.
- Click Next once done.
If you chose My Own Certificate follow these steps.
- Ensure you have the CSR details from your 3rd party provider on hand.
- Click Next.
- The next screen will prompt to input:
a. Certificate
b. Private Key
c. Pass Phrase (used by some SSL providers to keep Private Key safer by encoding Key, then delivering Pass Phrase a different way for security).
d. Select Next once done.
The system will now install the certificate.

Step 3: Installation
- Installation process can take 24-48 hours to complete and the SSL manager will appear to be stuck on INSTALLING during the process.
- Occasionally, the screen will remain blank - be patient. The SSL certificate is still being installed in the background.
- Confirmation screen should confirm the Vanity SSL is completed and display the secure IP address.
- If you are NOT seeing a confirmation screen after 24-48 hours and go back into the SSL Manager.
- Click on gear icon and select Domain Details to view the secure IP address.

Step 4: Verify Website IP & Set up HTTPS Redirect
- Confirm the IP address displayed in the SSL Manager matches with the Shaw Hosting's Web DNS address as shown on NS & DNS Settings.
- If the IP Matches: Site is already secure and skip to Step 2.
- If the IP Doesn't Match: DNS settings will need to be updated either through the Shaw portal or by your DNS host. If Shaw is hosting your DNS this can be done through the DNS Manager.
- Edit both '_' & 'www' records to point to new secure IP.
- Click Update.
- Edit both '_' & 'www' records to point to new secure IP.

- Turn on Enable Https Redirect to have site automatically redirect to a secure version of your site.

Important: If you are using a Content Management System (CMS) like WordPress, Joomla or Online Presence Builder, DO NOT check this option yet. When the SSL certificate becomes active you may lose access to your site. First enable SSL in your content manager and then turn on HTTPS Redirect.
Note: It can take a full 24 hours for changes to propagate across the web.
Not quite done yet! See below on how to test your files security.
Testing the security of your files
Once the SSL server certificate has been created, all the files under the Public folder of the root directory are encrypted and secured.
Test the security of your files by entering the following in the address bar of any browser and confirming that the URL begins with 'https':
- Generic SSL: https://secure11.securewebexchange.com/mydomain.com
- Vanity SSL: https://mydomain.com

If you are getting errors or your site isn't redirecting to HTTPs then follow these steps:
- Confirm that HTTPS is enabled in your Content Managment System (WordPress/Joomla, Online Presence builder) and that it has been turned on in the Shaw Hosting portal in the SSL Manager.
- Check if secure & secure-cgi-bin folders exist in root folder of your directory. You can use either File Manager Pro in your hosting portal or another FTP program like Filezilla.
- If the folders do exist contact Business Technical support for further assistance.

Renewing SSL certificate
SSL certificates do expire and need to be renewed before date listed in SSL Manager.
- Using 3rd party SSL provider site to update SSL:
- Using Same Provider: use the site where certificate was created to go through the renewal process. Check if new CSR details are generated for use in later step.
- Using New Provider: if using new provider, new CSR details will be needed in later step.
- Open SSL Manager
- Using Same Provider: select the Renew button. SSL site will have advised if you renew with existing or new CSR details.
- Using New Provider: select the gear icon and Erase Certificate, then install new following standard Vanity SSL process.


