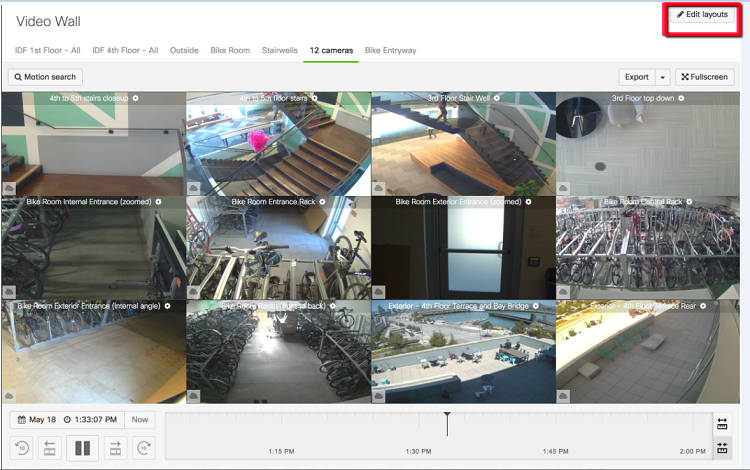
Learn how to create customized video walls for your Advantage Surveillance (formerly SmartSurveillance) to view live, as well as historical content.
How to create a Video Wall
Advantage Surveillance provides the ability to view up to 12 cameras live, as well as historical content on one webpage within a web browser. Each camera is accessible by clicking on its image, which will also display the individual camera's settings.
Get started by logging into the online portal at dashboard.meraki.com with your credentials.
- Navigate to Cameras > Monitor > Video Wall

- Select Edit Layouts.

- Select New Layout.
- Optional: Enter a name for your layout.
- Select the cameras you want on the layout by clicking on the thumbnail views at the bottom of the page.
- Resize videos on the layout by clicking and dragging the corners of the camera images.
- Click Save Layouts to finalize the Video Wall changes.

Adding a Dewarped Fisheye View to a Video Wall
To add a dewarped fisheye view to a video wall:
- Select the fisheye camera by either thumbnail or row entry, as detailed in the section above.
- Once selected, you will be presented with a modal to select a dewarped region to set as a view.
- Drag to select the desired region and click the Add Dewarped View button.

Once a dewarped view is added to a video wall, you can use the Edit Orientation button to make fine-tune adjustments.

To add a full frame fisheye view, click the Use Full Frame button.

Rotating Video Walls
Auto-rotate through your most important video walls.
- To use this, navigate to Cameras → Video Wall.
- On the top right of the screen, select the dropdown arrow next to the Start video wall rotation button to configure auto-rotation.
- Use the checkboxes to add any of the relevant video walls into your rotation, adjust the time interval between rotations and even copy and share these settings.
- Click the Start video wall rotation or Stop video wall rotation button to toggle the rotation.

How to delete an existing Video Wall
- Select Edit Layouts.
- Click on the x next to a layouts name.
- Click Save Layouts to finalize the Video Wall changes.
